Features of 100%, Random, and AQL
There is no need to register coordinates one by one as in inline inspection. This is a method of periodically registering defect data for each SKU.
It release you from having to fill in paper, calculate with a calculator, and copy it to a table as before, and it is possible to download Excel data with just a smartphone input.
Select style number
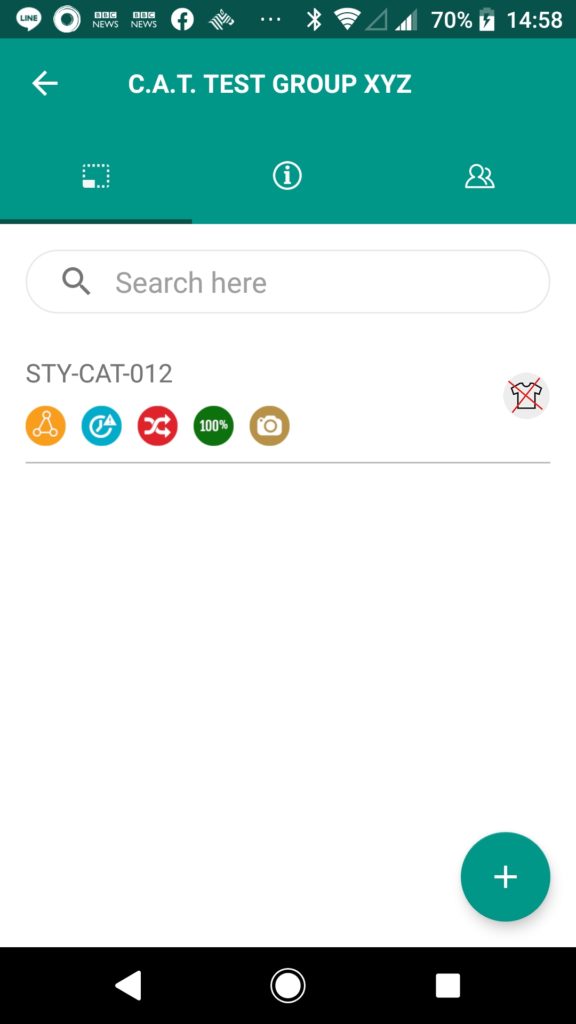
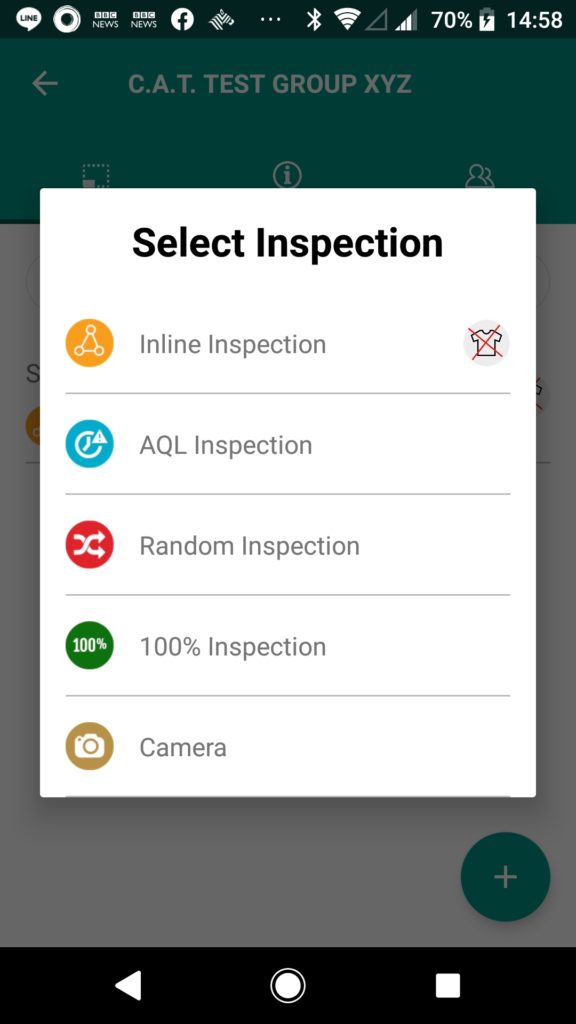
- Tap and select the applicable style number from the style number list on the group detail screen.
※It is possible to edit or duplicate the style number by pressing and holding the product number (Super user only) -
By tapping the style number, the inspection type set for that style number can be selected. This time, select “100% inspection”.
Inspection report setting
※The screen is slightly different for “100% inspection”, “Random inspection” and “AQL”
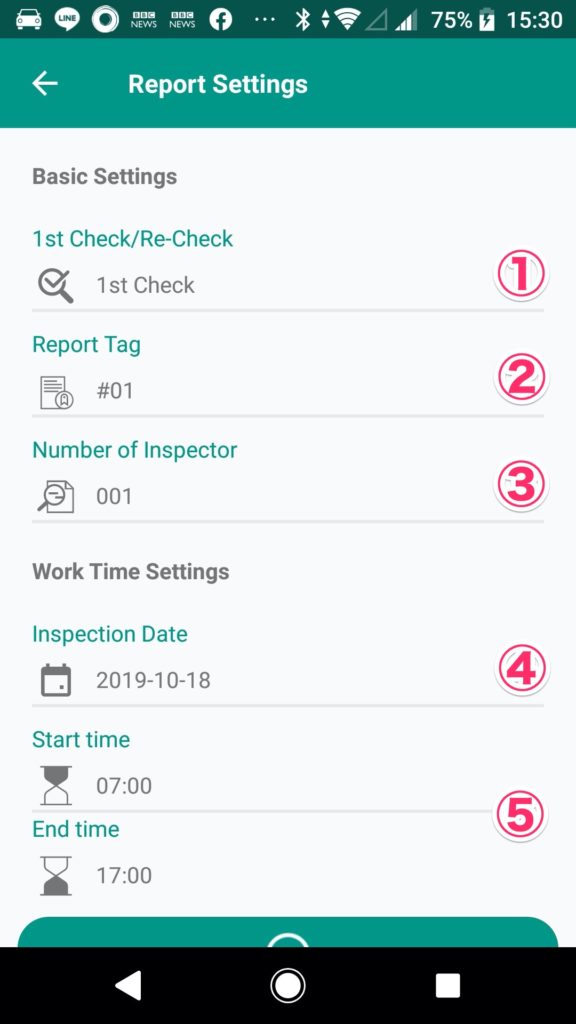
・① The First inspection or Re-inspection can be selected. It is also used as a condition for narrowing down inspection report aggregation.
・② By setting the report tag, it is possible to create an inspection report that is subdivided. For example, by using the tag number 1 for the result of the daily previous inspection and the tag number 2 for the subsequent regular inspection, the daily preliminary inspection result can be individually extracted, or by separating the tag numbers in the morning and afternoon and aggregating data for half a day, can be used for feedback to factories. In addition, there are various possible ways to improve the workplace, such as assigning a tag number to each FQC individual for in-line inspection and conducting evaluation and guidance.
・③ The number of inspectors can be specified in the range of 001-999.
・④ Specify the inspection date. It is possible to specify within the range from the inspection start date specified when creating the style number to the day, it is not possible to specify before the inspection start date or future date.
・⑤ It is possible to specify the working start time and end time.
※There is no meaning to specify at this time of Ver 0.0.14
※The following items are added only to AQL
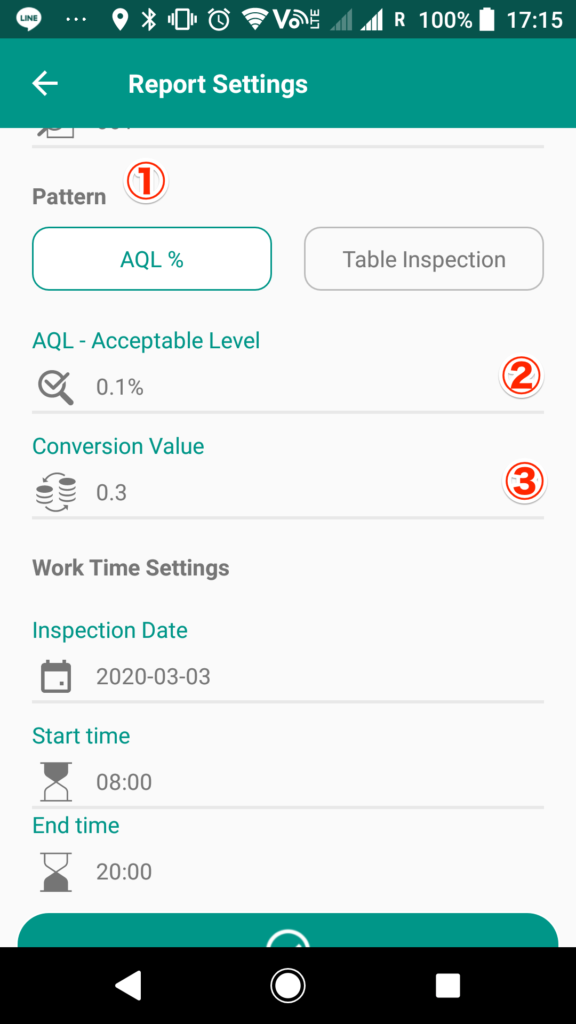
※If “AQL%” is selected in ①, two items must be specified.Please note that it is not possible to select “AQL%” if “Table Inspection” data with the same report number and the same date already exists.
・② is the defect rate for the number of inspections. If the defect rate exceeds the defect rate specified here, it will be rejected.
・③ is the value is used to convert minor defects to major defects. For example, if 0.2 is specified, one minor defect is converted to 0.2 major defect. Since the value is rounded down, even if 4 minor defects specified in 0.2 occur, it has the same meaning as 0 major defect, and when the number of minor defects reaches 5, it is counted as 1 major defect.
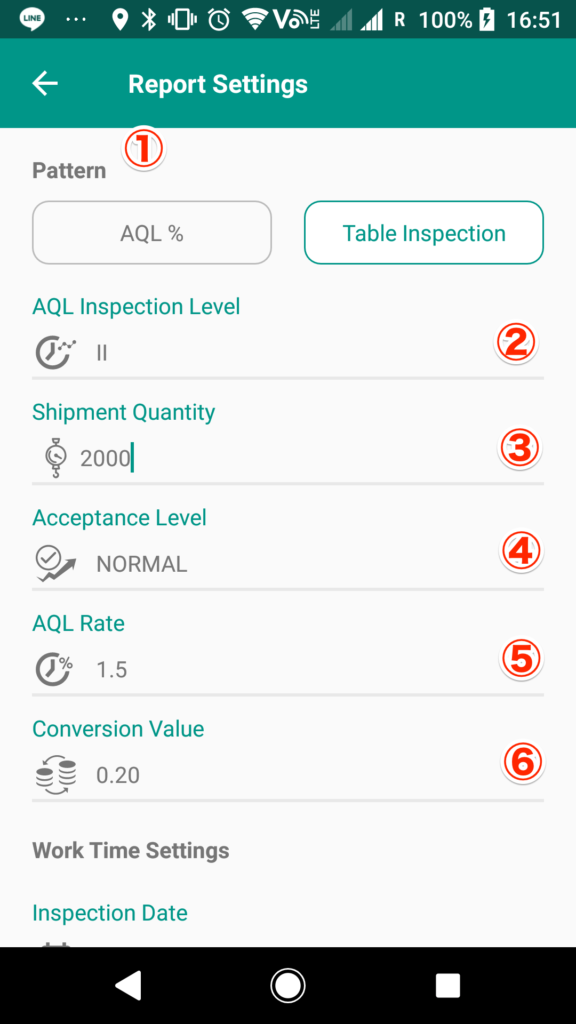
※If “Table Inspection” is selected in ①, it is necessary to specify 5 items. Note that “Table Inspection” cannot be selected if “AQL%” data with the same report number on the same date already exists.
・② The inspection level is the level required to determine the relationship between the lot size and the sample size(inspections quantity) of sampling , and must be set in advance for ramdom inspection.
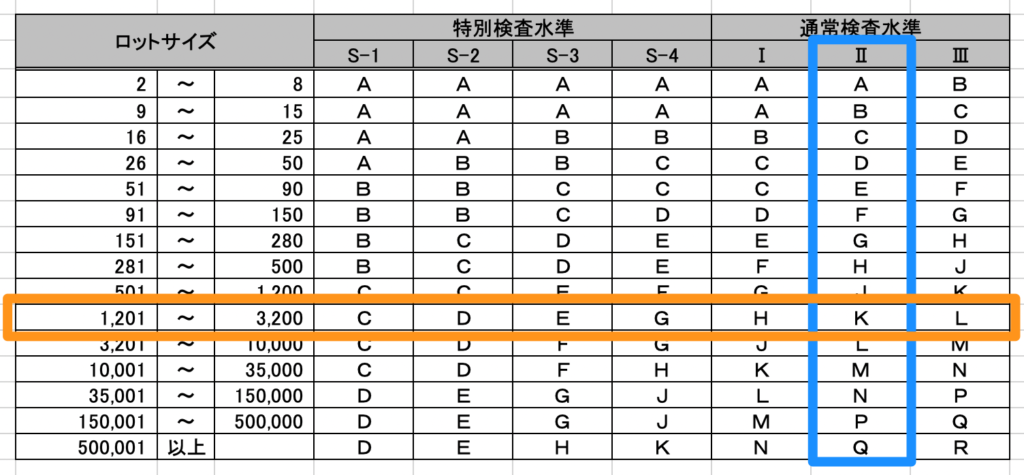
Select from 7 levels of special inspection level “S1 ~ S4” and normal inspection level “Ⅰ ~ Ⅲ”. The sample size (inspections quantity) is determined from the value specified here and the shipments quantity specified in ③
・③ Enter the number of shipments in the range of 2 to 99,999,999.The sample size (number of inspections) is determined by this value and the “AQL Inspection Level” specified in ②.
・④ The setting of the inspection severity. It is possible to specify from three levels.
STRICT:Inspection using a sampling inspection method that has stricter acceptance criteria than the corresponding normal inspection
NORMAL:Inspection using a sampling inspection method that guarantees a high probability of passing for the producer when the process average of the lot is better than AQL.
TOLERANCE:Inspection using a sampling inspection method that has a smaller sample size than the corresponding normal inspection
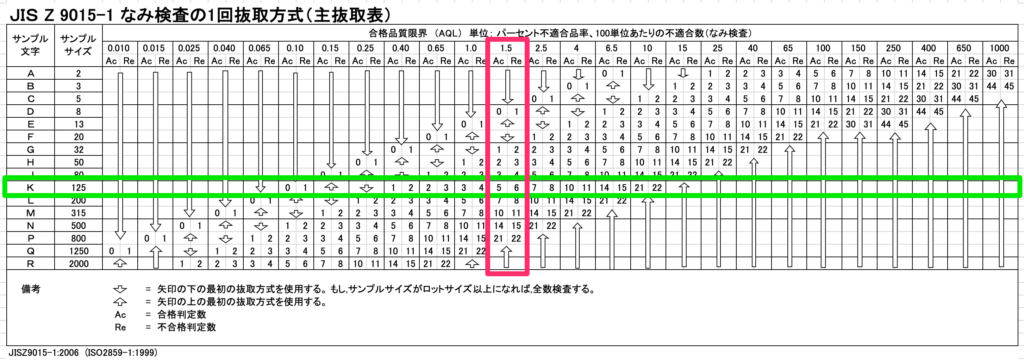
・⑤ The number of samples and the number of pass / fail judgments are determined from the sampling table according to the “② inspection level”, “③ shipment quantity”, “④ inspection severity” and the AQL value specified here.
・⑥ This value is used to convert minor defects to major defects. For example, if 0.2 is specified, one minor defect is converted to 0.2 major defect. Since the value is rounded down, even if 4 minor defects specified in 0.2 occur, it has the same meaning as 0 major defect, and when the number of minor defects reaches 5, it is counted as 1 major defect.
Example)
If “② Inspection level” is specified as “Normal inspection level Ⅱ (blue frame)” and “③ Shipment quantity” is “2,000 (orange frame)”, the sample letter “K” at the intersection of the table is selected.
In the state of sample letter “K (green frame)”, when “1.5 (red frame)” is selected for “⑤ Acceptance Quality Limit (AQL)” and “④ Normal Inspection” is performed, up to 5 defectives are accepted and 6 defectives are rejected.
JISZ9015-1 AQL index type sampling inspection Sampling inspection table (EXCEL)
Inspection screen explanation
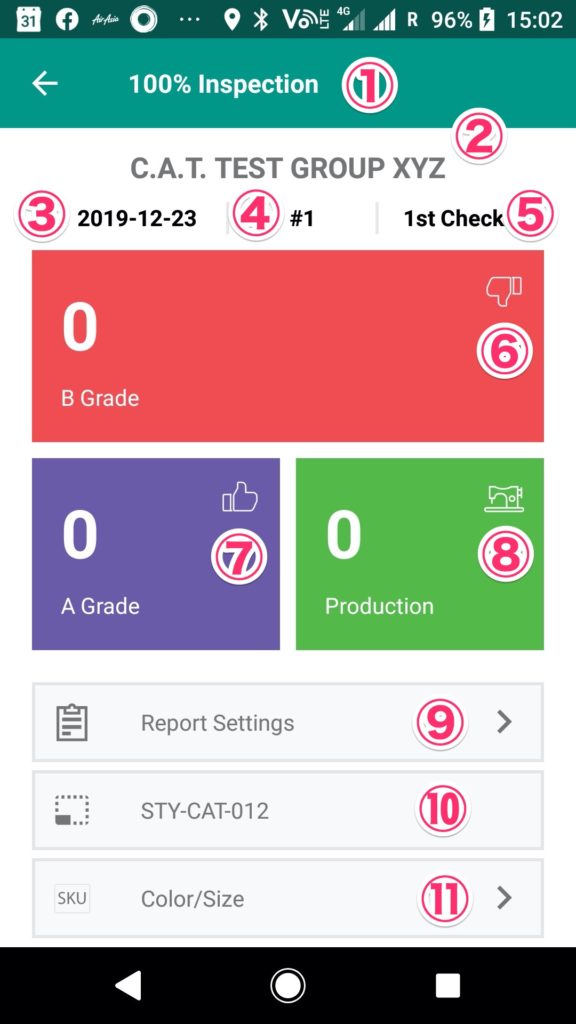
・① display the current inspection type.
・② display the group name in which the current style number is registered.
・③ display the inspection date specified in the inspection report settings.
・④ display the report tag number specified in the inspection report settings.
・⑤ display either the first inspection or re-inspection specified in the inspection report settings.
・⑥ is a defect data registration button, and the current total defect quantity is displayed.
・⑦ is a A grade quantity registration button, and the current total A grade quantity is displayed.
・⑧ is a production quantity registration button, and the current total production quantity is displayed. Although the productions quantity is an optional item, it is recommended that you enter them because entering them will allow you to see the progress of reducing the defects quantity and improving the productions quantity in a graph.
・Tap ⑨ to return to the “Inspection report settings” screen.
・⑩ display the current inspection style number.
・ It is possible to select the SKU to inspect from ⑪.
Input inspection data
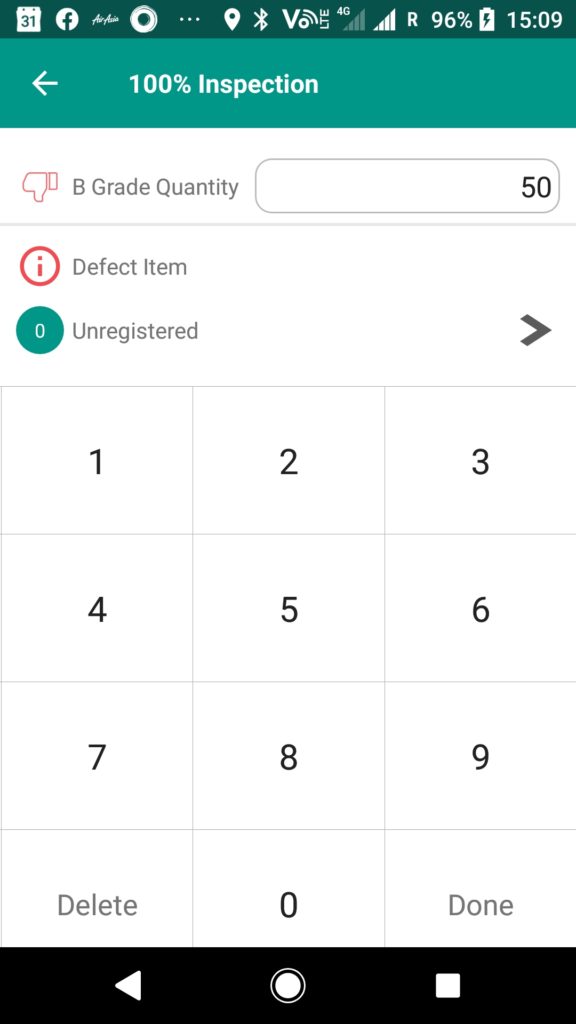
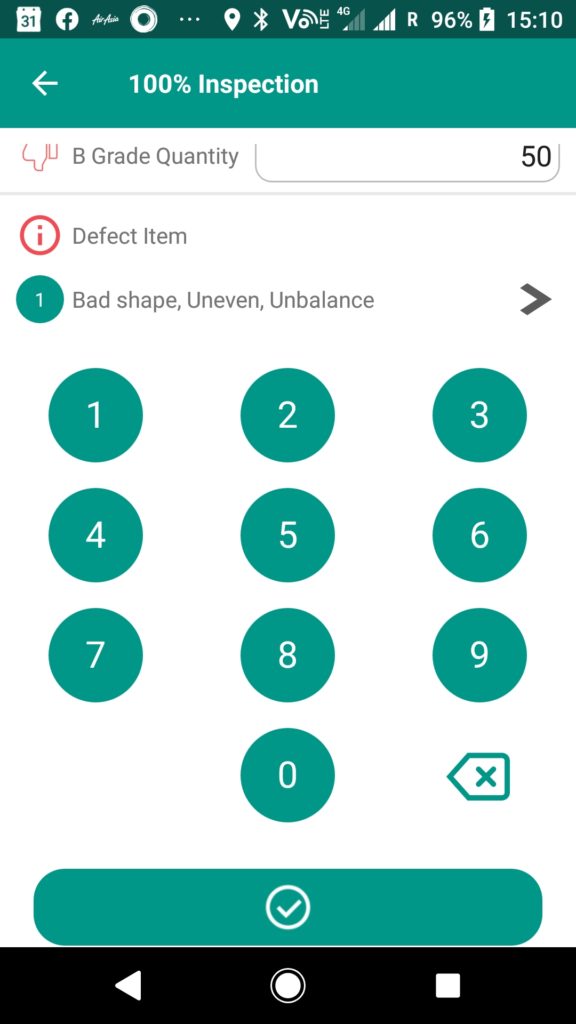
- Tap ⑥ on the inspection screen to register the defects quantity.
- When you tap the “Enter Quantity” field, a numerical value input button will be displayed at the bottom of the screen. Enter the number of defective items and tap “Done”.
- Enter the defective item number directly or select the defective item from the list.
- Lastly, tap the “Check” button at the bottom of the screen. Unlike in-line inspection, the data is ready to be sent to the server at this point.
Defect image shooting
Up to 10 images can be saved for one report. Please note that if more than 10 images are registered, the inspection report will not be published and aggregation will not be possible. If you want to publish or aggregate, repeat deletion until the number of unnecessary images is less than 10 and then publish.
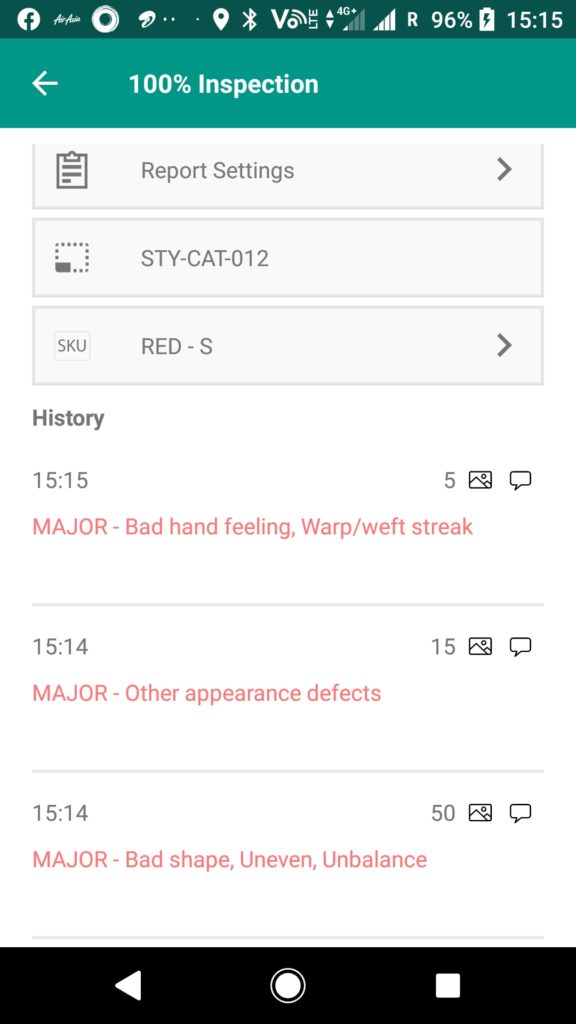
- Slide the inspection screen downward, the defective item information history is displayed.
- Find the defect item information you want to link and tap the photo icon on the right.
- Tap the photo mark to move to the shooting mode, so take a photo.
- Rotate and draw, and lastly tap the “Check” button to register the image. Unlike inline inspection, data is ready to be sent to the server at this point.